


Monarch Butterfly Cage Guide: Types, Setup, and Best Picks
A monarch butterfly cage gives your caterpillars a clean, enclosed space to eat, molt, and form chrysalides without getting picked off by wasps, spiders, or stink bugs. The cage you pick makes a real difference in survival rates, and most first-time rearers either buy something way too big or try to reuse a cardboard box that falls apart after a week of frass cleanup. This guide walks through the types of cages that actually work, how to set them up, and how to keep them disease-free through a full rearing season.
Whether you are raising three caterpillars off a backyard milkweed patch or running a rotation of thirty through August, the same basic principles apply. Ventilation matters more than floor space. Cleanability matters more than features. And placement matters more than either.
Key Takeaways
- Popup mesh cages are the gold standard for monarch rearing because they breathe well, collapse for storage, and wipe clean with a bleach solution between broods.
- Plastic shoe-box containers with ventilation holes work fine for early instars (1st through 3rd) but become humidity traps as caterpillars grow and produce more frass.
- Cage size should match caterpillar count rather than adult butterfly size. Overcrowding spreads OE spores and NPV virus faster than any other factor.
- Place cages in a bright room out of direct sunlight, away from heat vents and kitchen surfaces, and never outdoors where wasps can still reach through the mesh.
Why Monarchs Need a Cage in the First Place
Wild monarch eggs and caterpillars face survival odds of about 1 in 100 in most studies. Tachinid flies lay eggs on them, paper wasps pluck them off leaves, and diseases like Ophryocystis elektroscirrha (OE) and black death (NPV) spread quickly in crowded milkweed patches. An enclosed cage removes all of those threats at once.
The trade-off is that you become responsible for everything the wild would normally handle: fresh food, waste removal, humidity control, and clean surfaces. A good cage makes those daily tasks take five minutes instead of thirty, which is the difference between sticking with monarch rearing and burning out by the second brood.
If you are new to the whole process, the breakdown of monarch caterpillar stages through all five instars pairs well with this cage guide since each instar has slightly different space and feeding needs.
The Four Cage Types Worth Considering
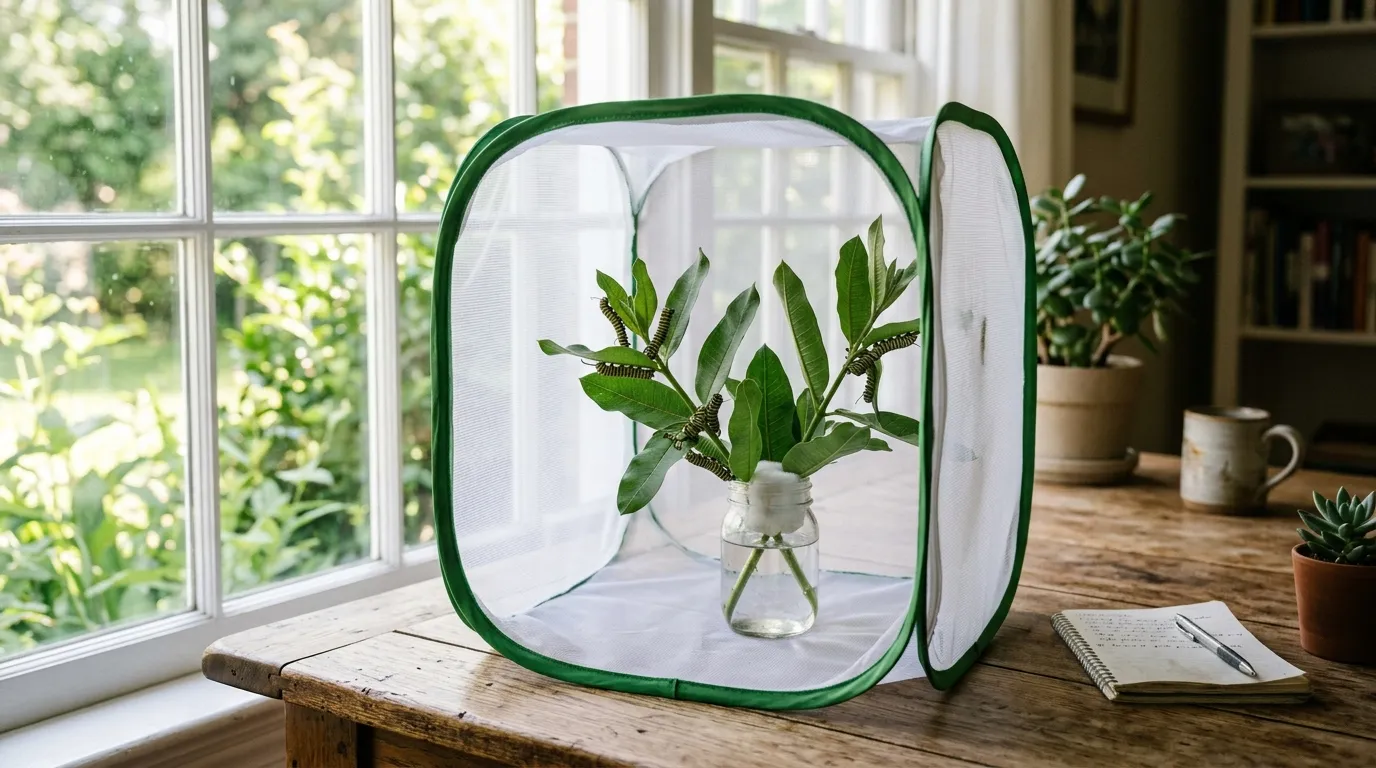
Popup Mesh Cages
If you only buy one cage, make it a popup mesh enclosure. These are collapsible fabric cubes with a zippered front and mesh panels on all sides, usually sold for butterfly rearing or reptile use. Restcloud, Nature Gift Store, and MonarchWatch all sell versions in the $15 to $40 range, and most collapse flat for off-season storage.
Mesh sides give you airflow on every face, which prevents the sweat-box effect that kills caterpillars in closed plastic tubs. Frass and leaf debris drop to a flat bottom that wipes clean with a paper towel and a 10 percent bleach solution. Chrysalides hang easily from the top mesh, and newly eclosed adults can grip the sides to pump up their wings without slipping.
The downsides are minor. Mesh snags on velcro and jewelry, and the zippers can wear out after heavy use. Some cheap versions have mesh too coarse to keep out tachinid fly eggs, so look for a fine, fly-screen-grade weave.
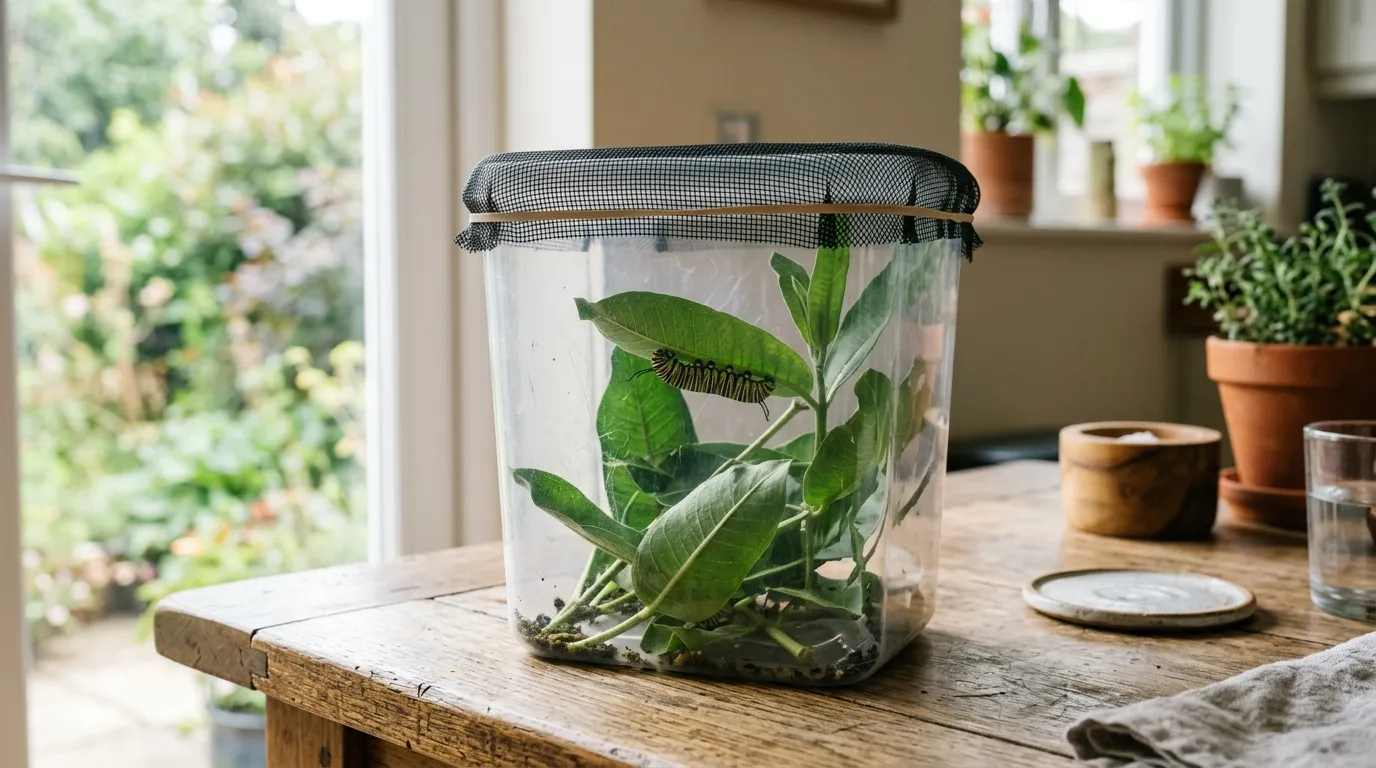
Plastic Shoe-Box Containers
Clear plastic bins (think Sterilite shoe boxes or 6-quart storage tubs) work as temporary housing for eggs and 1st through 3rd instar caterpillars. At that size, the larvae need very little space, and the smooth sides make spotting frass and uneaten milkweed easy.
The problem is ventilation. A sealed plastic box holds too much humidity once 4th and 5th instars start eating and defecating at full speed. Cut window holes in the lid and cover them with fine fiberglass mesh or a polyester fabric secured with hot glue. Even then, transfer caterpillars to a mesh cage around the middle of their 4th instar, before they enter the pre-pupation wandering stage.
Larger Flight Cages
Flight cages run 24 to 48 inches on a side and are designed to house adult butterflies long enough to tag, feed, or photograph them before release. If you tag for Monarch Watch or run a school display, a flight cage gives the butterflies room to warm up and stretch their wings without battering them against close walls.
For pure caterpillar rearing, a flight cage is overkill and harder to clean. The Raising Butterflies Habitat from Insect Lore and the BioQuip 24-inch collapsible cage are solid options if you want one enclosure that handles both larvae and adults.
DIY Options
You can build a perfectly workable cage from a laundry hamper with a fine mesh bag thrown over the top, or frame a wooden box with window screen stapled to the inside. PVC pipe and no-see-um netting make a lightweight rectangular cage for under $20 in materials.
The catch with DIY is sanitation. Wooden frames absorb frass liquid and harbor OE spores across seasons. If you go homemade, use materials you can bleach-wipe or replace annually, and avoid unsealed wood or fabric that can’t go through a wash cycle.
How Big Should Your Cage Be?
Size recommendations in most kit instructions focus on the adult butterfly, which is backwards. The caterpillar stage is where overcrowding causes real trouble, and the numbers matter more than the cube dimensions.
A rough rule of thumb: allow one gallon of cage volume per 5th instar caterpillar. A 12 x 12 x 12 inch mesh cube (about 7.5 gallons) comfortably holds 5 to 8 late-instar larvae along with a milkweed water tube. A 24 x 24 x 36 inch cage can handle 20 to 30. Go over those numbers and you start seeing cannibalism, frass-coated chrysalides, and elevated disease risk.
For eggs and tiny 1st instars, space needs are trivial. A deli container with ventilation holes holds dozens of eggs on a milkweed leaf. Split caterpillars into separate cages as they hit the 3rd instar, since that’s when they start eating visible amounts of leaf material.
Ventilation, Humidity, and Placement
Monarchs do best in conditions that match a shaded outdoor garden: 65 to 80 degrees Fahrenheit, 50 to 70 percent relative humidity, and gentle airflow. Mesh cages hit those targets naturally in most indoor rooms. Plastic containers need active management, usually by cracking the lid or drilling additional vents.
Placement is where a lot of rearers make mistakes. Direct sunlight through a window cooks a mesh cage in minutes since there’s no airflow to dissipate heat. Put the cage in a bright room but set it back from the window, or use a north-facing sill. Keep it away from kitchen counters where cooking fumes and cleaning sprays can drift in, and avoid rooms with pets who view the cage as entertainment.
A common question is whether to put the cage outside on a covered porch. I don’t recommend it. Paper wasps can still reach caterpillars through 1/8-inch mesh, and temperature swings on a porch can stress pupating larvae. The Monarch Joint Venture’s captive rearing guidance covers similar advice on keeping cages indoors.
Cleaning and Disease Prevention
This is the part most guides skip past, and it’s the single biggest factor in rearing success. Monarch diseases spread through contaminated frass, leaf surfaces, and cage walls. A dirty cage is a petri dish for OE and NPV, both of which can wipe out a full brood in days.
Here is the daily and seasonal cleaning routine that works:
- Every morning, remove yesterday’s frass and uneaten leaves. A paper towel liner at the bottom of the cage lets you pull out the mess in one motion.
- Replace milkweed cuttings with fresh stems in a water tube or florist vial (make sure caterpillars can’t fall into the water and drown).
- Between broods, wash the entire cage with warm soapy water, rinse, then spray with a 10 percent household bleach solution. Let it sit 10 minutes before rinsing again and air drying.
- At the end of the rearing season, do a deep clean and store the cage completely dry. Bleach-cleaned mesh cages carry zero disease load into the next spring.
If you spot a dead or lethargic caterpillar, remove it immediately and quarantine any siblings. OE-infected monarchs often emerge with deformed wings, and a single released infected adult can spread spores across a whole milkweed patch. Project Monarch Health runs a free citizen-science OE testing program that mails you tape strips for sampling adults before release.
Setting Up the Inside of the Cage
A well-configured monarch cage has only a few elements. Overbuilding the interior makes cleaning harder and doesn’t improve caterpillar outcomes.
Start with a flat paper towel or piece of wax paper as the bottom liner. Place your milkweed stems in a water tube with a pinched lid so caterpillars can’t drown. Floral water picks from a craft store work great, or use a small vase with plastic wrap stretched over the top and stems poked through. Skip potted milkweed plants inside the cage since the soil harbors mold and the leaves are impossible to clean after frass accumulates.
You don’t need branches, climbing sticks, or decorations. Caterpillars climb the mesh walls on their own, and they will find the top of the cage to pupate from. Adding extra surfaces just means more stuff to bleach later. If you want a perch for freshly eclosed butterflies to hang and dry their wings, a single vertical twig propped in a corner is enough.
Always source milkweed you know is pesticide-free. Big-box nursery milkweed is often treated with systemic neonicotinoids that kill caterpillars within days of feeding. Grow your own, buy from a native plant nursery, or collect from verified untreated patches. The larval host plants guide covers milkweed species by region and what works best for rearing purposes.
From Caterpillar to Release: Cage Logistics
Once 5th instars stop eating and start wandering around the top of the cage, they are getting ready to pupate. Do not disturb them. Within 24 hours they hang in a J-shape from the mesh and then form a chrysalis. Leave chrysalides attached to the cage top for the full 10 to 14 days until eclosion.
If a chrysalis falls (it happens), you can reattach it by tying a thin thread around the cremaster (the black stem at the top) and hanging it from the cage with tape. The butterfly inside will still develop normally as long as it has room to hang wings-down after eclosing. For context on what the pupal stage involves, the explainer on the difference between a cocoon and a chrysalis covers why monarchs form chrysalides and how they differ from moth cocoons.
After eclosion, give the adult at least four hours to fully inflate and harden its wings before transferring to a release area. A mesh cage makes this step safer since the butterfly can grip the walls without slipping. Release on a warm, sunny afternoon when temperatures are above 60 degrees Fahrenheit and there’s no rain in the forecast.
Common Mistakes That Kill Caterpillars
After rearing hundreds of monarchs and talking with other rearers, the same handful of cage mistakes come up over and over. Most of them are preventable once you know what to look for.
Using a cage that is too small packs caterpillars against each other’s frass, which spreads disease fast. Leaving uneaten wilted milkweed in the cage lets mold bloom on the leaves and in the water tube. Spraying the cage with a scented cleaning product leaves residue caterpillars crawl across and absorb through their spiracles. Skipping the between-brood bleach wash carries OE spores into the next batch.
The biggest one: bringing in too many caterpillars at once because you feel bad about the ones in your garden. Start with five. Get the routine down. Then scale up in later broods. Quality beats quantity every time when it comes to successful captive rearing.
If you are thinking about expanding beyond monarchs, the same cage principles apply to other species. The guide on raising swallowtails indoors walks through how the setup changes for larger caterpillars that feed on parsley and fennel instead of milkweed.
Frequently Asked Questions
What is the best monarch butterfly cage for beginners?
A 12 x 12 x 12 inch popup mesh cube is the easiest starting point. Restcloud, Nature Gift Store, and Insect Lore all sell versions in this size for under $25. They collapse for storage, clean easily, and handle 5 to 8 caterpillars at a time, which is the right number for learning the daily care routine.
Can I use a fish tank or terrarium as a monarch cage?
Glass tanks work poorly because they trap humidity and have solid walls that don’t let caterpillars climb to pupate. If a tank is all you have, use a mesh lid with lots of ventilation, keep the humidity below 70 percent, and add a vertical stick near the top for pupation sites. A mesh popup cage is almost always a better choice for the same price.
How often should I clean a monarch rearing cage?
Daily frass removal and milkweed replacement are a must. Full cage washing with soap and a bleach rinse should happen between broods (roughly every 2 to 3 weeks during peak rearing season) and anytime you see dead larvae, mold, or wet frass buildup. Clean cages are the biggest single factor in avoiding OE and NPV outbreaks.
Should I keep my monarch cage indoors or outdoors?
Indoors is safer. Outdoor cages are still vulnerable to tachinid flies laying eggs through mesh, wasp predation on exposed caterpillars at the edges, and temperature swings that stress pupae. A bright room away from direct sun, heat vents, and pets gives caterpillars steady conditions and keeps predators out entirely.
How many caterpillars can I put in one cage?
Roughly one 5th instar per gallon of cage volume is the safe ratio. A 12-inch mesh cube holds 5 to 8 late-instar caterpillars. A 24-inch cube handles 20 to 30. Overcrowding causes frass contamination, leaf competition, and faster disease spread, so err on the side of fewer per cage and split them into multiple enclosures if your broods grow.
Do I need a separate cage for the chrysalis stage?
No. Caterpillars pupate on the top mesh of their rearing cage and stay there through eclosion. Just remove any uneaten milkweed and clean up frass before the first chrysalis forms so the cage stays tidy during the 10 to 14 day pupal stage. A separate cage only makes sense if you need to move chrysalides for display or photography.